
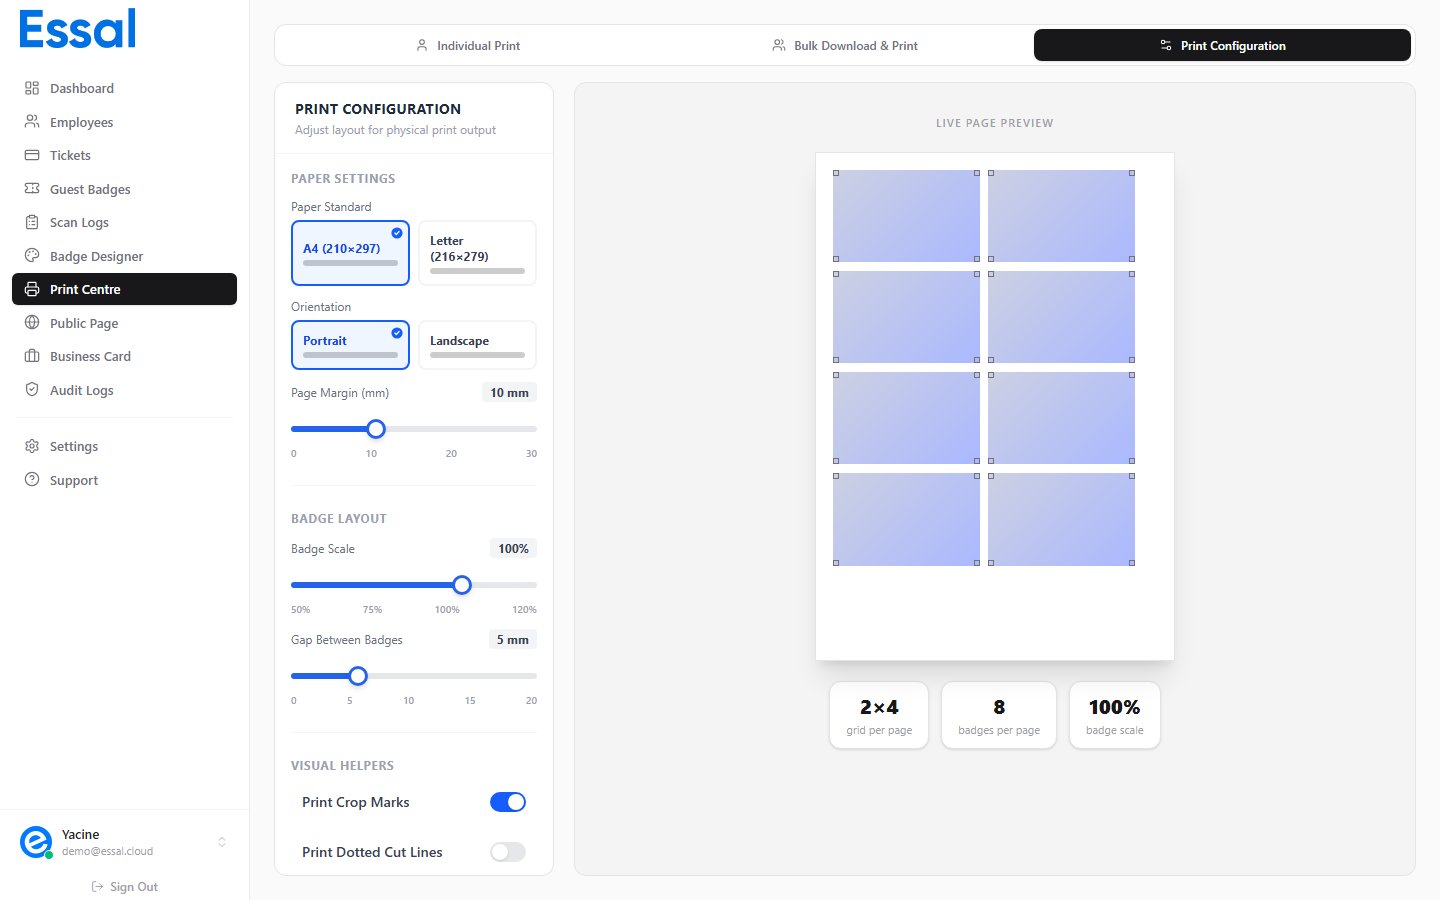
Accessing Print Settings
- Go to Print Center in the sidebar
- Click the Config tab (third tab, after Individual and Bulk)
Paper Settings
Paper Size
Choose the paper size that matches what you’re printing on. This affects how many badges fit per page.
Orientation
For CR80-size badge cards (landscape orientation), Landscape page orientation typically gives the most efficient layout.
Page Margin
Controls the blank border around the entire page before badges begin.- Range: 0–30 mm, in 1 mm steps
- Default: 10 mm
- Reduce this if you want badges closer to the edge (useful when cutting cards manually)
- Increase it if your printer requires a larger non-printable margin
Badge Layout
Badge Scale
Controls the size of each badge relative to its natural print size.- Range: 50%–120%, in 5% steps
- Default: 100%
- At 100%, a standard CR80 badge prints at its full physical card size (85.6 × 54 mm)
- Reduce to fit more badges per page; increase to fill the page with fewer, larger badges
- The live preview shows the resulting columns × rows count and badges per page
Tip: If a badge at 100% scale doesn’t fit correctly with your card stock, reduce to 90% or 95% to add a small safety margin.
Grid Gap
Controls the spacing between adjacent badges on the page.- Range: 0–20 mm, in 1 mm steps
- Default: 5 mm
- Larger gaps make it easier to cut cards by hand
- Set to 0 mm if using a card cutter with precise registration
Visual Helpers
These settings add guide lines to the printed output to assist with cutting.Crop Marks
- Default: On
- Adds small L-shaped corner marks at each corner of every badge
- These marks extend outside the badge border so they remain visible after printing even if the badge fills to the edge
- Use crop marks when cutting with scissors or a manual guillotine cutter
Cut Lines
- Default: Off
- Adds a dashed border around the full perimeter of each badge
- More prominent than crop marks — easier to see for hand-cutting
- Can be used alongside crop marks or instead of them
For professional cutting: Crop marks only (no cut lines) are the standard for print shop work. Cut lines are better for in-office cutting where the guide line needs to be visible.
Live Preview
The right side of the Config tab shows a scaled-down preview of the print page with your current settings applied. It displays:- The badge grid layout (number of columns and rows)
- Sample badge renderings in the grid
- The number of badges per page
- How all settings interact together