> ## Documentation Index
> Fetch the complete documentation index at: https://support.essal.cloud/llms.txt
> Use this file to discover all available pages before exploring further.
# Editing an Employee Record
{/* category: Employee Management */}
This article explains how to open an employee's record and navigate the four tabs available in the employee modal — Profile, Security, Badges, and Health & Safety.
***
## Opening the Employee Modal
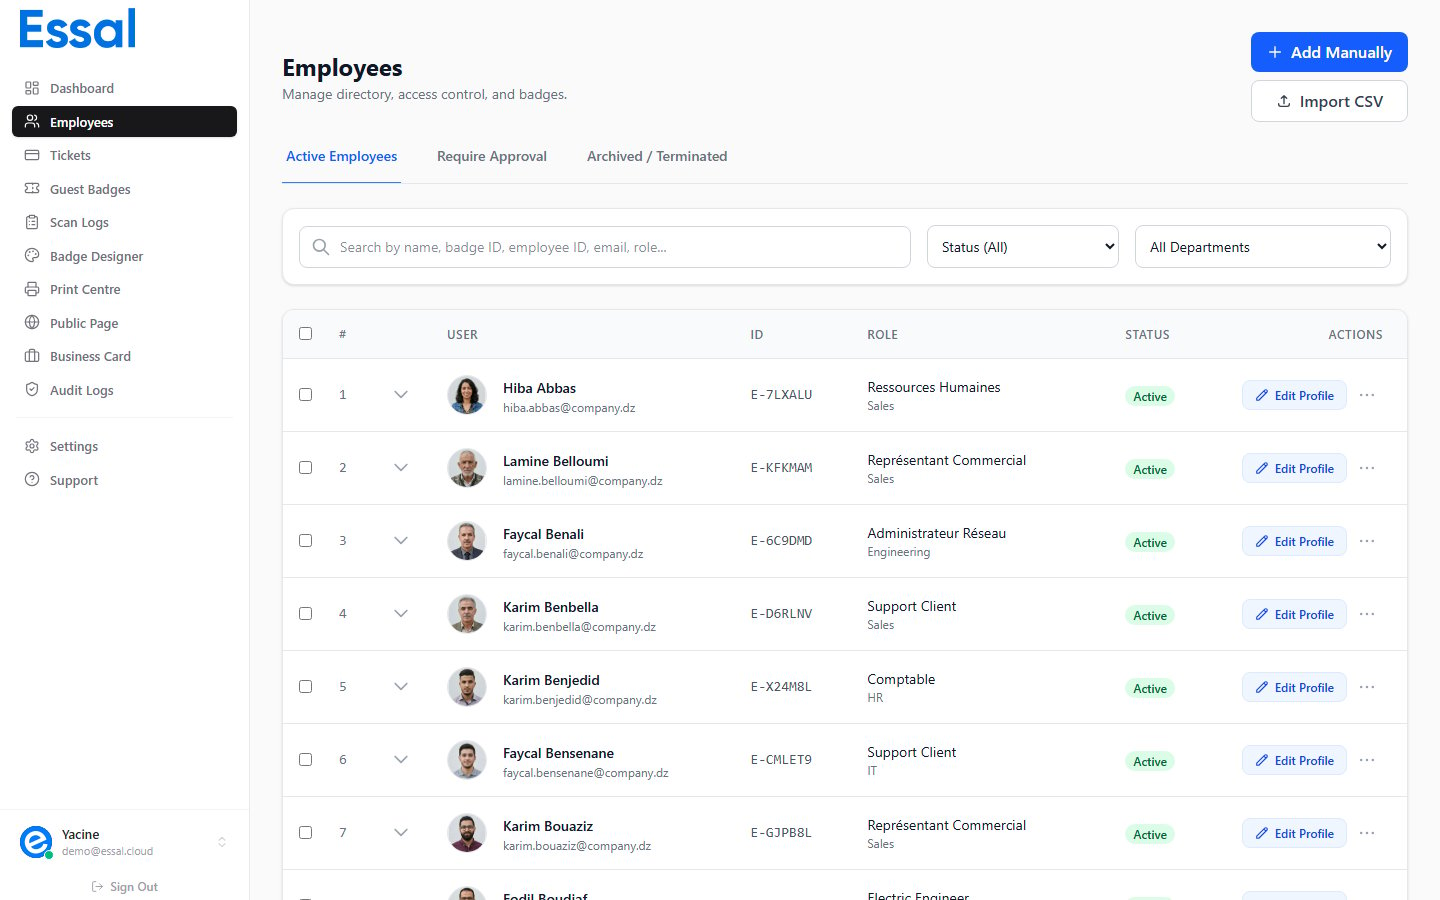
Navigate to **Employees** in the sidebar to open the employee list.
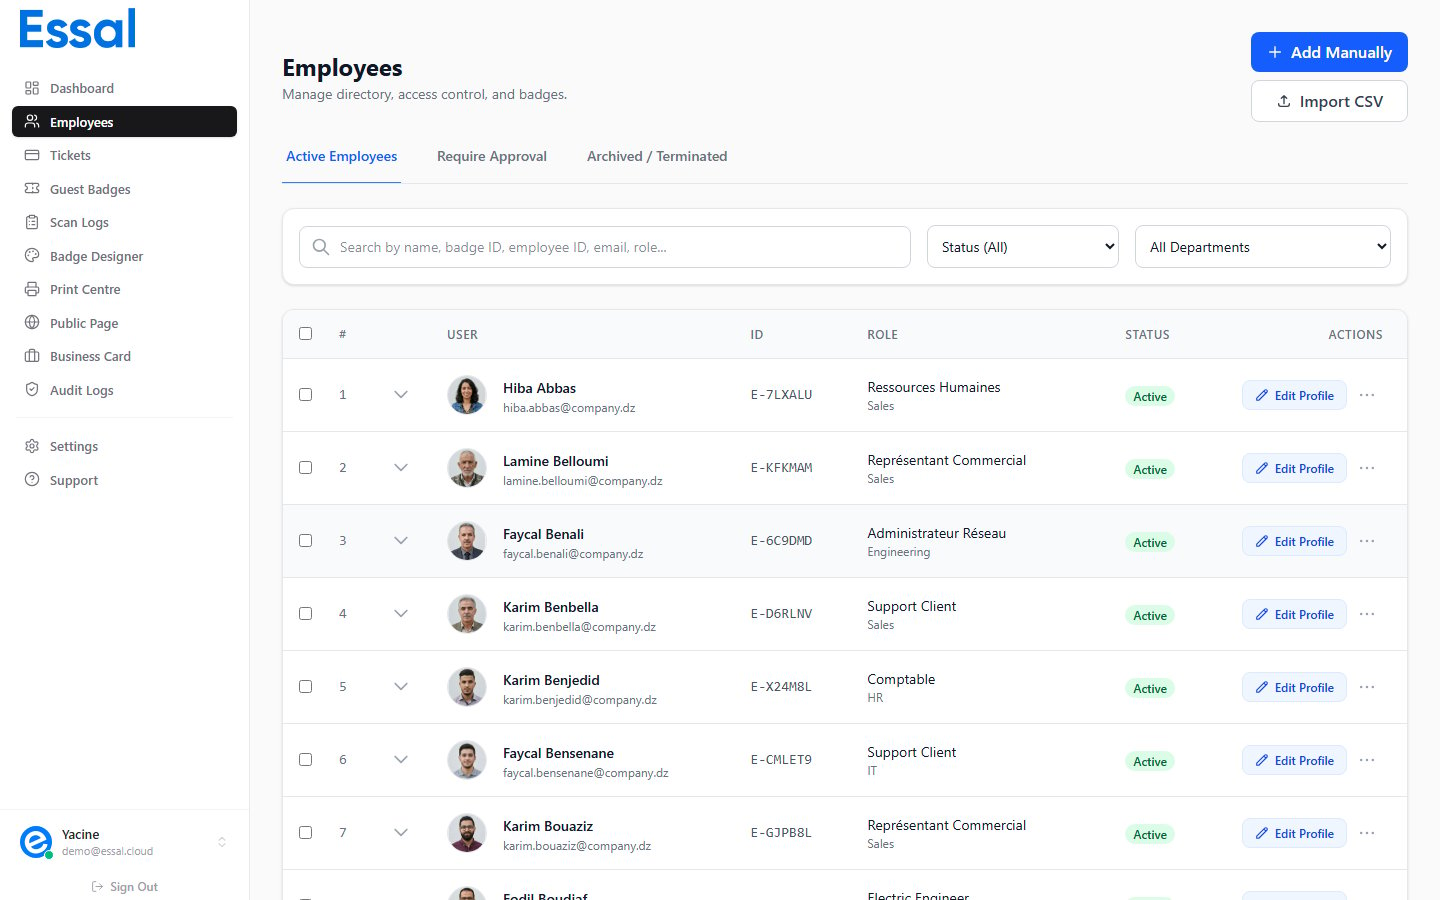 Click the **Edit** button (blue, labelled "Edit") on any row to open the employee modal. You can also click the employee's **name** — it opens the same modal on the Profile tab.
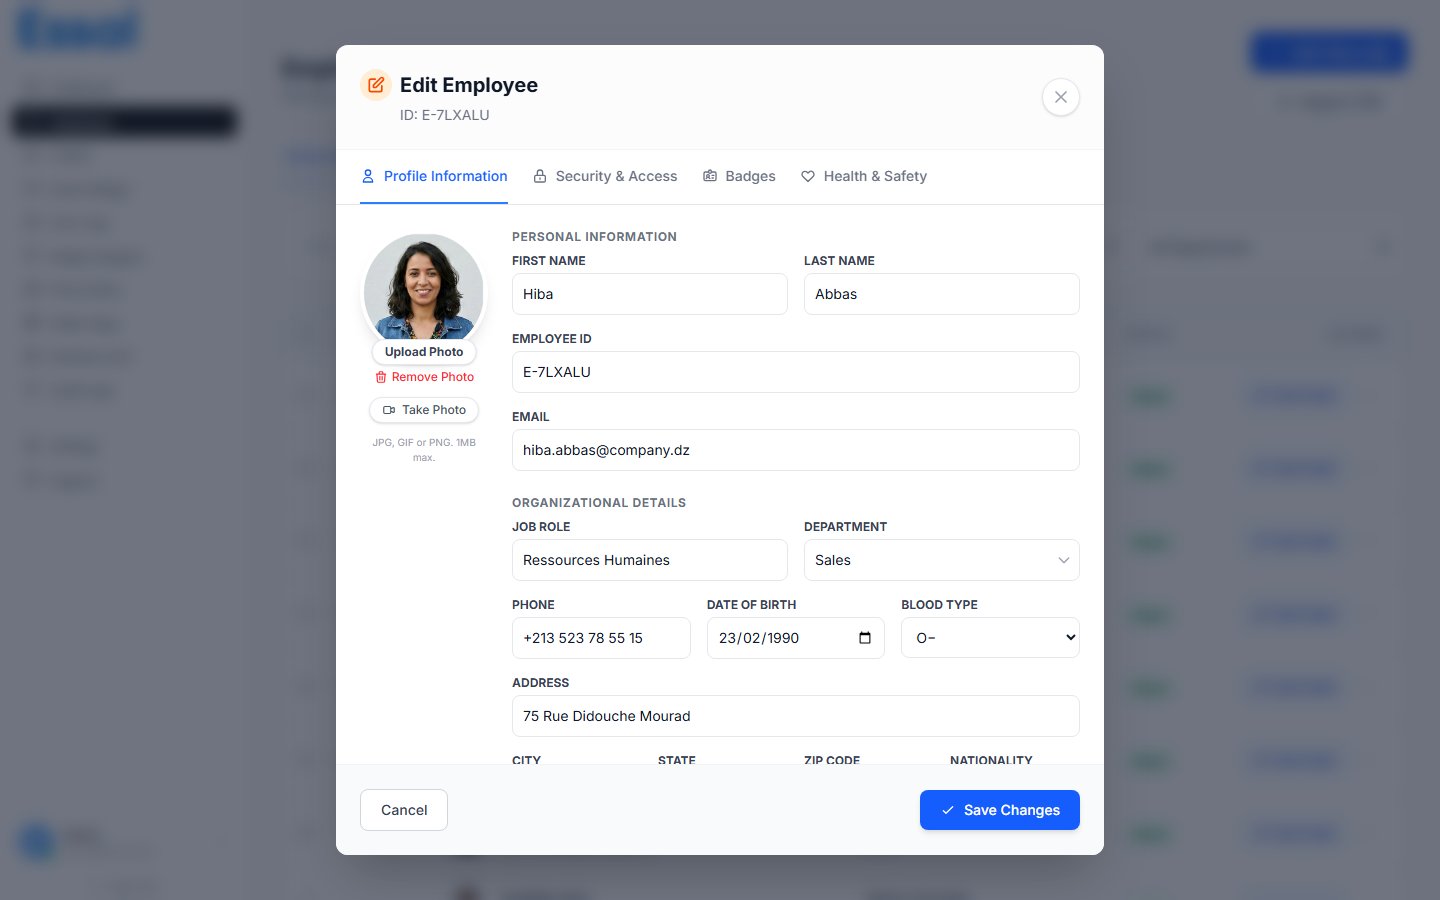
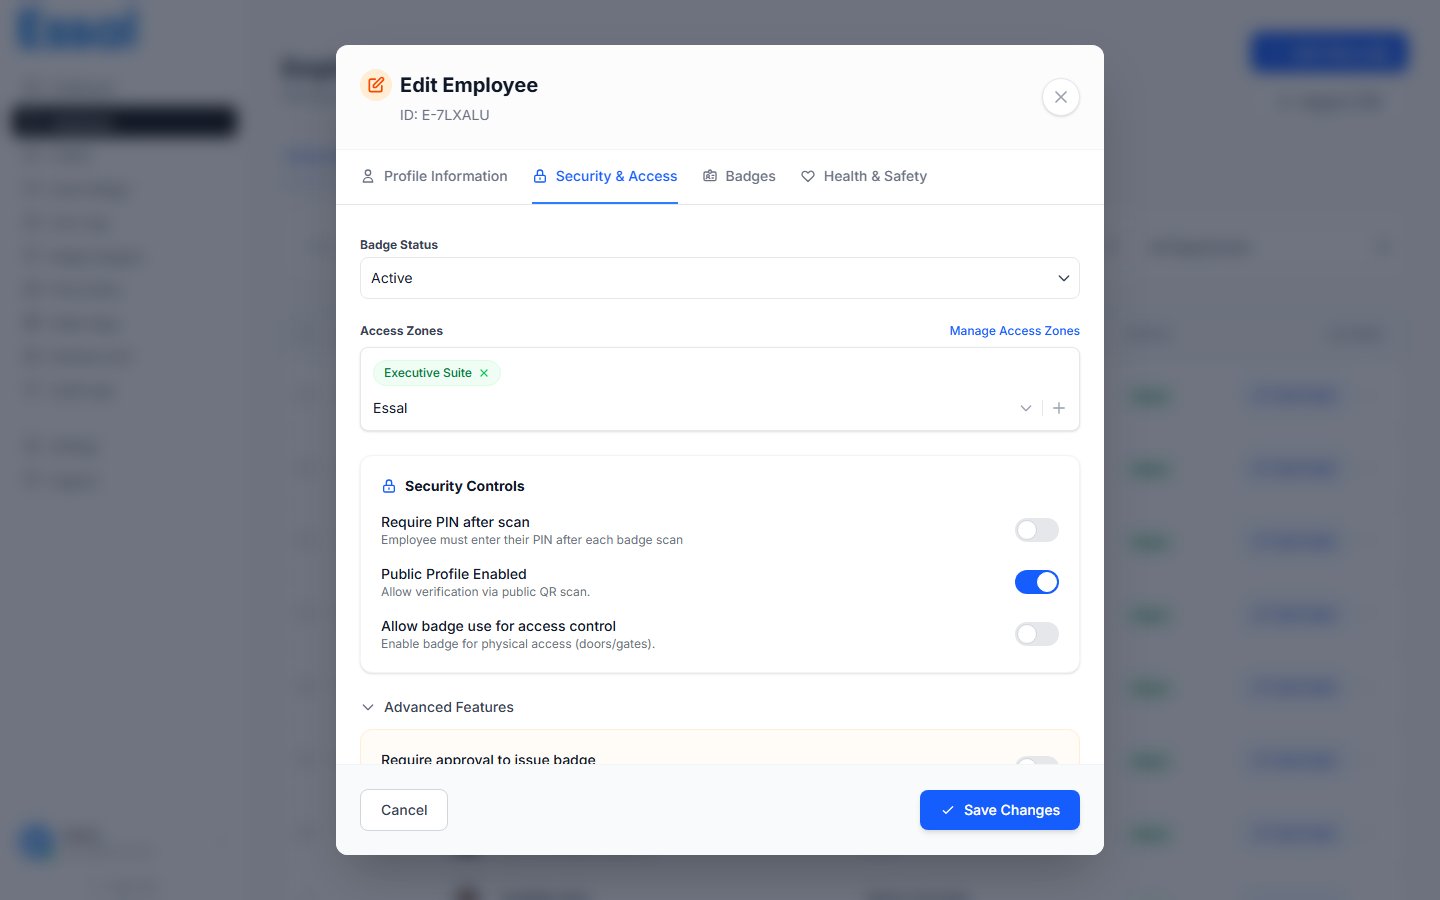
The modal header shows:
* **"Edit Employee"** as the title
* The employee's unique ID below the title (e.g. `EMP-A3F7K2`)
* A close (×) button in the top-right corner
> **Unsaved changes**: If you make changes and try to close the modal without saving, a confirmation prompt will appear. Click **Discard** to lose changes or **Keep editing** to stay.
***
## Navigating the Four Tabs
The modal has four tabs along the top. Click a tab to switch, or use the keyboard shortcuts `Ctrl+1` through `Ctrl+4`.
Click the **Edit** button (blue, labelled "Edit") on any row to open the employee modal. You can also click the employee's **name** — it opens the same modal on the Profile tab.
The modal header shows:
* **"Edit Employee"** as the title
* The employee's unique ID below the title (e.g. `EMP-A3F7K2`)
* A close (×) button in the top-right corner
> **Unsaved changes**: If you make changes and try to close the modal without saving, a confirmation prompt will appear. Click **Discard** to lose changes or **Keep editing** to stay.
***
## Navigating the Four Tabs
The modal has four tabs along the top. Click a tab to switch, or use the keyboard shortcuts `Ctrl+1` through `Ctrl+4`.
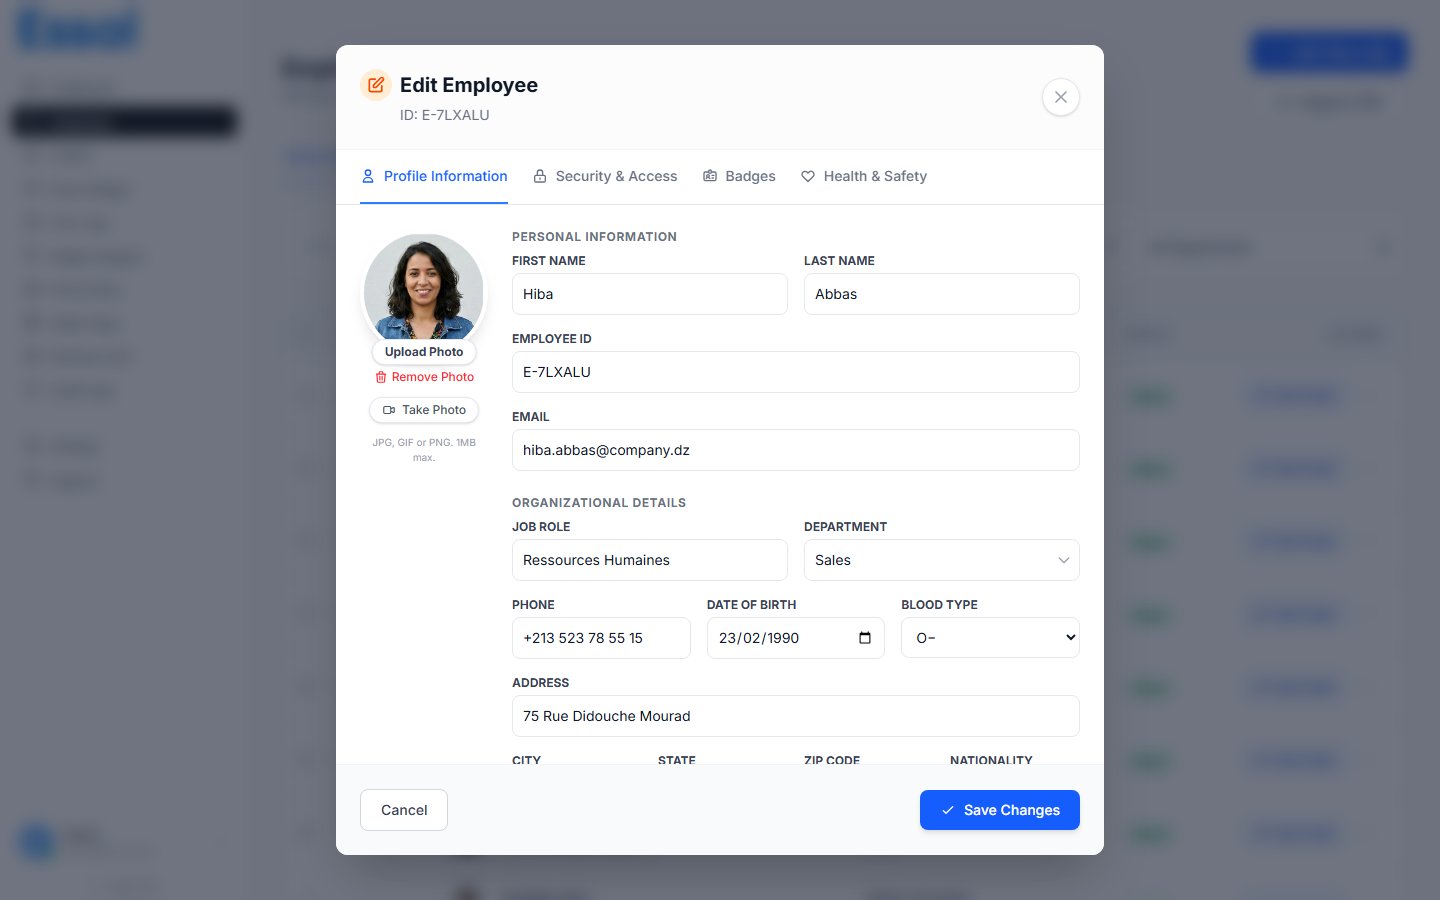 | Tab | Shortcut | What's here |
| ------------------- | -------- | ----------------------------------------------------------------------- |
| **Profile** | `Ctrl+1` | Personal info, organizational details, photo, custom fields |
| **Security** | `Ctrl+2` | Badge status, access zones, 2FA PIN, access schedule, advanced controls |
| **Badges** | `Ctrl+3` | Full badge history — issue, revoke, or reactivate badges |
| **Health & Safety** | `Ctrl+4` | Emergency contact, allergies, medical conditions, safety certifications |
***
## Profile Tab
The Profile tab contains all the core employee information. See Adding a New Employee for a full field reference.
Key points when editing:
* **Employee ID** is read-only after the record is first saved — it cannot be changed
* **Department** must already exist in Settings → Departments before it can be selected
* **Custom fields** appear at the bottom of the form if your admin has defined them in Settings → Custom Fields
***
## Security Tab
The Security tab controls how the employee's badge behaves during scanning and what access restrictions apply.
| Tab | Shortcut | What's here |
| ------------------- | -------- | ----------------------------------------------------------------------- |
| **Profile** | `Ctrl+1` | Personal info, organizational details, photo, custom fields |
| **Security** | `Ctrl+2` | Badge status, access zones, 2FA PIN, access schedule, advanced controls |
| **Badges** | `Ctrl+3` | Full badge history — issue, revoke, or reactivate badges |
| **Health & Safety** | `Ctrl+4` | Emergency contact, allergies, medical conditions, safety certifications |
***
## Profile Tab
The Profile tab contains all the core employee information. See Adding a New Employee for a full field reference.
Key points when editing:
* **Employee ID** is read-only after the record is first saved — it cannot be changed
* **Department** must already exist in Settings → Departments before it can be selected
* **Custom fields** appear at the bottom of the form if your admin has defined them in Settings → Custom Fields
***
## Security Tab
The Security tab controls how the employee's badge behaves during scanning and what access restrictions apply.
 ### Badge Status
The **Status** dropdown has three options you can set directly:
| Status | Effect |
| ----------------- | ------------------------------------------------------------------------ |
| **Active** | Badge is valid; scans are processed normally |
| **Suspended** | Badge is temporarily deactivated; scans are denied |
| **Lost / Stolen** | Badge is permanently deactivated immediately; a new badge must be issued |
> **Note**: `Pending` and `Terminated` statuses are set through the employee list actions (Approve, Terminate), not from this dropdown.
### Access Zones
Access zones define which physical areas this employee can enter. When a check-in device is assigned to a zone, it will only grant entry to employees assigned to that zone.
* The **current zones** appear as removable tags — click × to remove one
* Use the **zone dropdown** to add additional zones from the list defined in Settings → Access Zones
* If no zones are assigned, the employee can be scanned at any device (zone restriction is not enforced)
* Click **Manage Access Zones** to open the zone settings page
### Security Controls
| Toggle | What it does |
| -------------------------------------- | --------------------------------------------------------------------------------------------------------------------------------------------- |
| **Require PIN After Scan** | Employees must enter a 4-digit PIN at the scanner after their QR code is scanned. If enabled with no PIN set, a random PIN is auto-generated. |
| **Public Profile Enabled** | When on, scanning the badge QR opens the employee's public profile. When off, scans are blocked with an "access disabled" message. |
| **Allow Badge Use for Access Control** | Enables physical access control integration — the badge can be used to open doors or barriers. |
### 2FA PIN Details
When **Require PIN After Scan** is enabled:
* A 4-digit numeric field appears
* Click **Generate** to create a random PIN automatically
* The PIN is shown in plain text until the record is saved — after saving, only `••••` is displayed with a **Reset** button
* The PIN is stored encrypted; share it with the employee separately
### Time Restricted Access
Enable the **Time Restricted Access** checkbox to restrict when the employee's badge is valid:
* Set **From** and **Until** times using the time pickers
* Toggle individual days using the **Su Mo Tu We Th Fr Sa** buttons (blue = allowed)
* The default when first enabling is Monday through Friday, 09:00–17:00
* Outside the allowed window, scans are denied with an "outside schedule" message
### Advanced Features
Three additional security settings are grouped in an expandable section:
| Setting | When to use |
| ----------------------------------------------- | -------------------------------------------------------------------------------------------------------------------------------------------- |
| **Require approval to issue badge** | When enabled, the employee moves to `Pending` status and must be manually approved by an Admin or Manager before their badge becomes active. |
| **Show profile only to authenticated scanners** | Restricts profile visibility to registered check-in devices only — useful for executive or sensitive roles. |
| **Require ID with Badge** | The check-in app shows a prompt instructing the security guard to verify the employee's physical ID document alongside the badge scan. |
***
## Badges Tab
The Badges tab shows the complete badge history for this employee — every badge ever issued, its current status, and its issue/deactivation dates.
### Badge Status
The **Status** dropdown has three options you can set directly:
| Status | Effect |
| ----------------- | ------------------------------------------------------------------------ |
| **Active** | Badge is valid; scans are processed normally |
| **Suspended** | Badge is temporarily deactivated; scans are denied |
| **Lost / Stolen** | Badge is permanently deactivated immediately; a new badge must be issued |
> **Note**: `Pending` and `Terminated` statuses are set through the employee list actions (Approve, Terminate), not from this dropdown.
### Access Zones
Access zones define which physical areas this employee can enter. When a check-in device is assigned to a zone, it will only grant entry to employees assigned to that zone.
* The **current zones** appear as removable tags — click × to remove one
* Use the **zone dropdown** to add additional zones from the list defined in Settings → Access Zones
* If no zones are assigned, the employee can be scanned at any device (zone restriction is not enforced)
* Click **Manage Access Zones** to open the zone settings page
### Security Controls
| Toggle | What it does |
| -------------------------------------- | --------------------------------------------------------------------------------------------------------------------------------------------- |
| **Require PIN After Scan** | Employees must enter a 4-digit PIN at the scanner after their QR code is scanned. If enabled with no PIN set, a random PIN is auto-generated. |
| **Public Profile Enabled** | When on, scanning the badge QR opens the employee's public profile. When off, scans are blocked with an "access disabled" message. |
| **Allow Badge Use for Access Control** | Enables physical access control integration — the badge can be used to open doors or barriers. |
### 2FA PIN Details
When **Require PIN After Scan** is enabled:
* A 4-digit numeric field appears
* Click **Generate** to create a random PIN automatically
* The PIN is shown in plain text until the record is saved — after saving, only `••••` is displayed with a **Reset** button
* The PIN is stored encrypted; share it with the employee separately
### Time Restricted Access
Enable the **Time Restricted Access** checkbox to restrict when the employee's badge is valid:
* Set **From** and **Until** times using the time pickers
* Toggle individual days using the **Su Mo Tu We Th Fr Sa** buttons (blue = allowed)
* The default when first enabling is Monday through Friday, 09:00–17:00
* Outside the allowed window, scans are denied with an "outside schedule" message
### Advanced Features
Three additional security settings are grouped in an expandable section:
| Setting | When to use |
| ----------------------------------------------- | -------------------------------------------------------------------------------------------------------------------------------------------- |
| **Require approval to issue badge** | When enabled, the employee moves to `Pending` status and must be manually approved by an Admin or Manager before their badge becomes active. |
| **Show profile only to authenticated scanners** | Restricts profile visibility to registered check-in devices only — useful for executive or sensitive roles. |
| **Require ID with Badge** | The check-in app shows a prompt instructing the security guard to verify the employee's physical ID document alongside the badge scan. |
***
## Badges Tab
The Badges tab shows the complete badge history for this employee — every badge ever issued, its current status, and its issue/deactivation dates.
 ### Issue New Badge
Click **Issue New Badge** to generate a new badge with a unique Badge ID. This:
1. Creates a new badge entry with status `Active`
2. Deactivates any currently active badge (sets it to `Inactive` with a deactivation timestamp)
3. Updates the employee's `activeBadgeId`
> The **Issue New Badge** button is disabled if the employee already has an active badge, or if the First Name or Last Name fields on the Profile tab are empty.
### Badge List
Each badge in the history shows:
* **Badge ID** — the unique identifier (e.g. `BDG-X7K2M9`)
* **Issued date** — when the badge was created
* **Status** — Active (green), Lost, or Inactive
* **Deactivated date** — shown for inactive/lost badges
### Revoking and Reactivating
* **Revoke** (shown on active badges) — marks the badge as `Lost` and deactivates it. A confirmation prompt appears before the action is applied.
* **Reactivate** (shown on inactive/lost badges) — restores the badge to `Active`. Disabled if another badge is already active or if the employee's name fields are empty.
***
## Health & Safety Tab
The Health & Safety tab stores sensitive employee data for emergency and safety management.
### Issue New Badge
Click **Issue New Badge** to generate a new badge with a unique Badge ID. This:
1. Creates a new badge entry with status `Active`
2. Deactivates any currently active badge (sets it to `Inactive` with a deactivation timestamp)
3. Updates the employee's `activeBadgeId`
> The **Issue New Badge** button is disabled if the employee already has an active badge, or if the First Name or Last Name fields on the Profile tab are empty.
### Badge List
Each badge in the history shows:
* **Badge ID** — the unique identifier (e.g. `BDG-X7K2M9`)
* **Issued date** — when the badge was created
* **Status** — Active (green), Lost, or Inactive
* **Deactivated date** — shown for inactive/lost badges
### Revoking and Reactivating
* **Revoke** (shown on active badges) — marks the badge as `Lost` and deactivates it. A confirmation prompt appears before the action is applied.
* **Reactivate** (shown on inactive/lost badges) — restores the badge to `Active`. Disabled if another badge is already active or if the employee's name fields are empty.
***
## Health & Safety Tab
The Health & Safety tab stores sensitive employee data for emergency and safety management.
 | Section | Fields |
| ----------------------------------- | --------------------------------------------------------------------------- |
| **Emergency Contact** | Name, Phone, Relationship |
| **Allergies** | Tag list — type and press Enter or click Add |
| **Medical Conditions** | Tag list — same interaction |
| **Disabilities / Additional Notes** | Free-text field |
| **PPE Requirements** | Tag list for required personal protective equipment |
| **Safety Certifications** | List of certifications with name, cert number, issued date, and expiry date |
### Adding a Safety Certification
1. Click **Add Certification** to reveal the form
2. Enter the certification **Name** (required), **Cert Number** (optional), **Issued Date**, and **Expiry Date**
3. Click **Add Certification** to save it to the list
Certifications with an expiry date are automatically flagged:
* **Expiring Soon** (within 30 days) — amber pill
* **Expired** — red pill
***
## Saving Changes
Click **Save** in the bottom-right corner of the modal, or press `Alt+S`. The button is disabled if either First Name or Last Name is empty.
A spinner appears while the save is processing. After a successful save, the modal remains open so you can continue editing.
| Section | Fields |
| ----------------------------------- | --------------------------------------------------------------------------- |
| **Emergency Contact** | Name, Phone, Relationship |
| **Allergies** | Tag list — type and press Enter or click Add |
| **Medical Conditions** | Tag list — same interaction |
| **Disabilities / Additional Notes** | Free-text field |
| **PPE Requirements** | Tag list for required personal protective equipment |
| **Safety Certifications** | List of certifications with name, cert number, issued date, and expiry date |
### Adding a Safety Certification
1. Click **Add Certification** to reveal the form
2. Enter the certification **Name** (required), **Cert Number** (optional), **Issued Date**, and **Expiry Date**
3. Click **Add Certification** to save it to the list
Certifications with an expiry date are automatically flagged:
* **Expiring Soon** (within 30 days) — amber pill
* **Expired** — red pill
***
## Saving Changes
Click **Save** in the bottom-right corner of the modal, or press `Alt+S`. The button is disabled if either First Name or Last Name is empty.
A spinner appears while the save is processing. After a successful save, the modal remains open so you can continue editing.