> ## Documentation Index
> Fetch the complete documentation index at: https://support.essal.cloud/llms.txt
> Use this file to discover all available pages before exploring further.
# Adding a New Employee
{/* category: Employee Management */}
This article walks through adding a single employee record manually. For adding many employees at once, see Importing Employees from CSV.
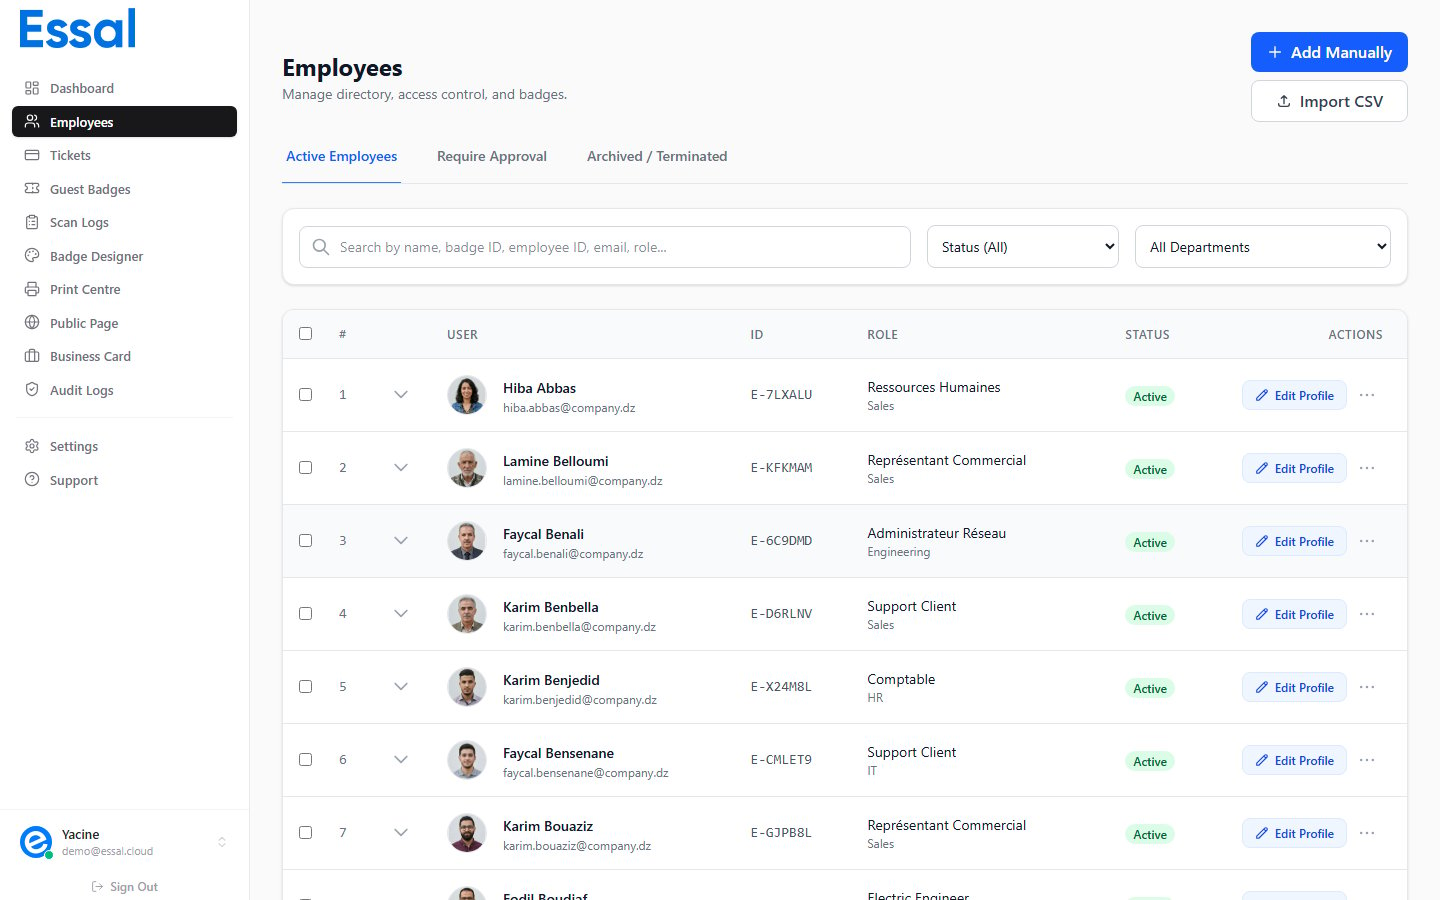
Navigate to **Employees** in the sidebar, then click **Add Employee** in the top-right corner.
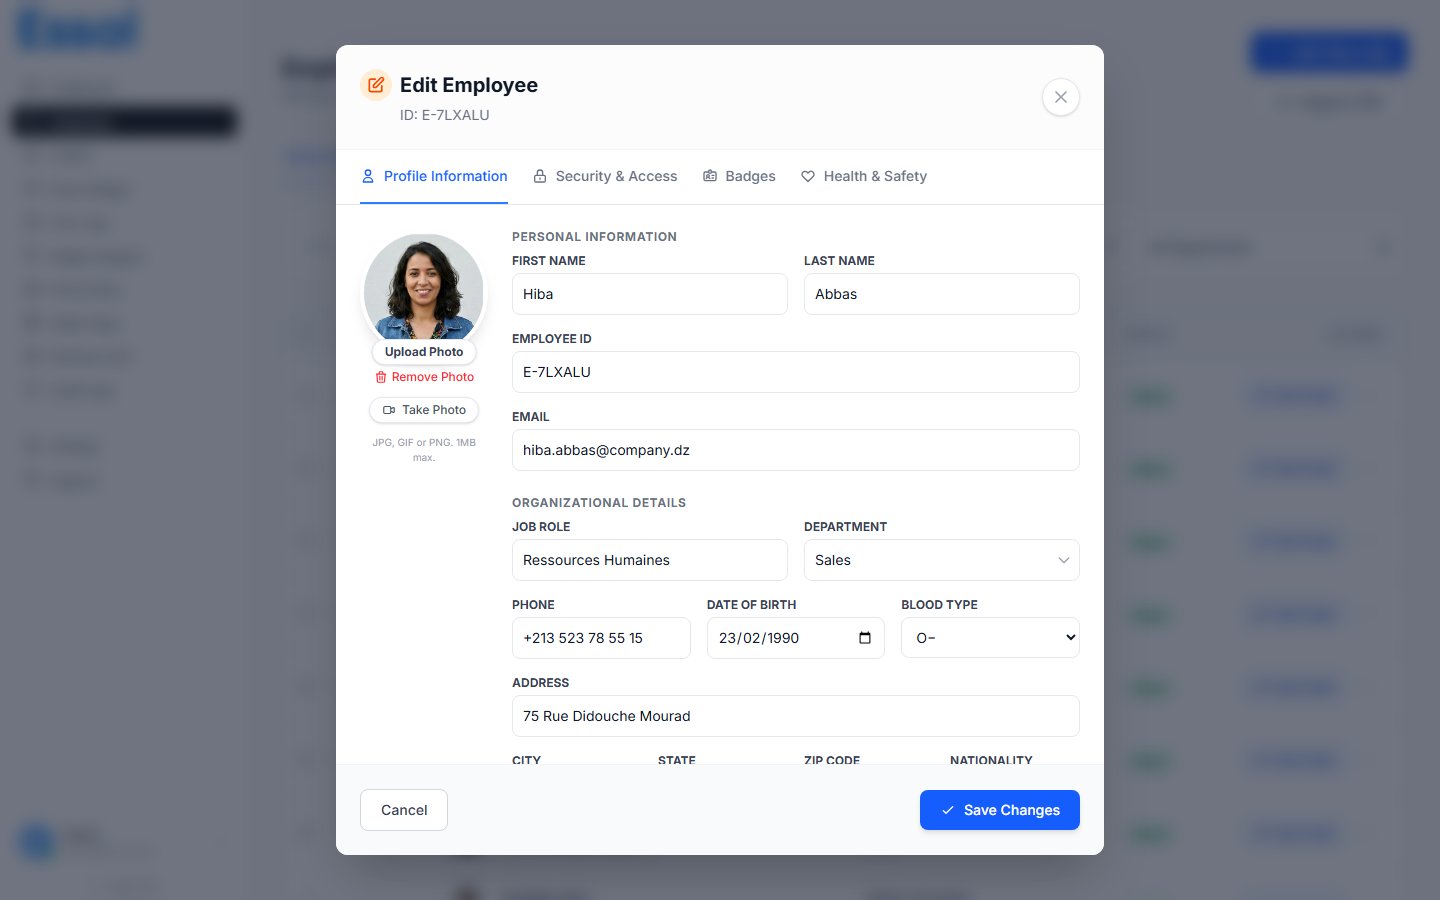
 The employee modal opens on the **Profile** tab, ready to fill in.
 ***
## Required Fields
Only two fields are required to save an employee record:
* **First Name**
* **Last Name**
Everything else is optional — you can fill in additional details now or come back later to edit the record.
***
## Profile Tab — Field Reference
The Profile tab is divided into two sections: **Personal Information** and **Organizational Details**.
### Personal Information
| Field | Notes |
| ---------------------- | ------------------------------------------------------------------------------------------------------ |
| **First Name** | Required |
| **Last Name** | Required |
| **Employee ID** | Auto-generated (e.g. `EMP-A3F7K2`). Editable only when creating a new record — read-only after saving. |
| **Email** | Work email address. Used for portal login and notifications. |
| **Phone** | Work or mobile phone number |
| **Date of Birth** | Optional — not shown on the badge by default |
| **Blood Type** | Optional — A+, A−, B+, B−, AB+, AB−, O+, O−. Can appear on the badge if enabled in the designer. |
| **Address** | Street address |
| **City / State / ZIP** | Location fields |
| **Nationality** | Optional |
| **Bio** | Free-text bio — shown on public profiles and the Employee Portal if enabled |
### Organizational Details
| Field | Notes |
| -------------- | -------------------------------------------------------------------------------------------------------------------------------- |
| **Job Role** | The person's title or position (e.g. *Security Officer*, *HR Manager*). Shown on the badge if enabled. |
| **Department** | Select from departments defined in Settings. Departments must exist before they can be selected here — see Managing Departments. |
### Custom Fields
If your admin has defined custom attribute fields (Settings → Custom Fields), they appear below the standard fields. Fields marked with a red asterisk are required.
***
## Adding a Photo
The profile photo appears on the employee's badge and public profile. Three methods are available:
**Upload from file** — Click the photo circle or the **Upload Photo** button. Supported formats: any image file. Maximum size: **2 MB**. The photo is cropped to a circle on the badge.
**Capture from webcam** — Click **Take Photo** to open the camera. Review the captured image, then click **Accept** to use it or **Retake** to try again.
**No photo** — If no photo is uploaded, a placeholder avatar is shown on the badge. You can add a photo later by editing the employee record.
> **AI photo enhancement** (Claid integration): If your tenant has the Claid photo API configured, the background is automatically removed from uploaded photos.
***
## Saving the Record
Click **Save** in the bottom-right of the modal (or press **Alt+S**). The employee is added to the list with status **Active**, and a badge is generated automatically using your badge template.
If either the First Name or Last Name field is empty, the Save button is disabled.
***
## Employee Tabs After Saving
Once a record is saved, the modal has four tabs:
| Tab | What's here |
| ------------------- | ------------------------------------------------------------------------------------------------------- |
| **Profile** | All the fields above — editable at any time |
| **Security** | Badge status, 2FA PIN, access schedule, access zones, authenticated-scanner-only toggle |
| **Badges** | Badge history — issue a new badge, view or revoke previous badges |
| **Health & Safety** | Emergency contact, allergies, medical conditions, disabilities, safety certifications, PPE requirements |
These tabs are covered in their own articles. For now, the defaults (Active status, no PIN, no schedule restrictions) are appropriate for most new employees.
***
## Approval Workflow
When the **employee approval workflow** is enabled on your tenant, newly added employees are placed in a **Pending** status instead of Active. They appear in the **Requires Approval** sub-tab of the Employees list. An Admin or Manager must review and approve them before their badge becomes active and scannable.
If you don't see a Requires Approval tab, the workflow is not enabled on your tenant.
***
## Keyboard Shortcuts
| Shortcut | Action |
| ------------ | -------------------------------------------------------------- |
| `Alt + N` | Open the Add Employee modal from the Employees list |
| `Alt + S` | Save the current employee record (inside the modal) |
| `Ctrl + 1–4` | Switch between Profile, Security, Badges, Health & Safety tabs |
| `Escape` | Close the modal (prompts if there are unsaved changes) |
***
## Required Fields
Only two fields are required to save an employee record:
* **First Name**
* **Last Name**
Everything else is optional — you can fill in additional details now or come back later to edit the record.
***
## Profile Tab — Field Reference
The Profile tab is divided into two sections: **Personal Information** and **Organizational Details**.
### Personal Information
| Field | Notes |
| ---------------------- | ------------------------------------------------------------------------------------------------------ |
| **First Name** | Required |
| **Last Name** | Required |
| **Employee ID** | Auto-generated (e.g. `EMP-A3F7K2`). Editable only when creating a new record — read-only after saving. |
| **Email** | Work email address. Used for portal login and notifications. |
| **Phone** | Work or mobile phone number |
| **Date of Birth** | Optional — not shown on the badge by default |
| **Blood Type** | Optional — A+, A−, B+, B−, AB+, AB−, O+, O−. Can appear on the badge if enabled in the designer. |
| **Address** | Street address |
| **City / State / ZIP** | Location fields |
| **Nationality** | Optional |
| **Bio** | Free-text bio — shown on public profiles and the Employee Portal if enabled |
### Organizational Details
| Field | Notes |
| -------------- | -------------------------------------------------------------------------------------------------------------------------------- |
| **Job Role** | The person's title or position (e.g. *Security Officer*, *HR Manager*). Shown on the badge if enabled. |
| **Department** | Select from departments defined in Settings. Departments must exist before they can be selected here — see Managing Departments. |
### Custom Fields
If your admin has defined custom attribute fields (Settings → Custom Fields), they appear below the standard fields. Fields marked with a red asterisk are required.
***
## Adding a Photo
The profile photo appears on the employee's badge and public profile. Three methods are available:
**Upload from file** — Click the photo circle or the **Upload Photo** button. Supported formats: any image file. Maximum size: **2 MB**. The photo is cropped to a circle on the badge.
**Capture from webcam** — Click **Take Photo** to open the camera. Review the captured image, then click **Accept** to use it or **Retake** to try again.
**No photo** — If no photo is uploaded, a placeholder avatar is shown on the badge. You can add a photo later by editing the employee record.
> **AI photo enhancement** (Claid integration): If your tenant has the Claid photo API configured, the background is automatically removed from uploaded photos.
***
## Saving the Record
Click **Save** in the bottom-right of the modal (or press **Alt+S**). The employee is added to the list with status **Active**, and a badge is generated automatically using your badge template.
If either the First Name or Last Name field is empty, the Save button is disabled.
***
## Employee Tabs After Saving
Once a record is saved, the modal has four tabs:
| Tab | What's here |
| ------------------- | ------------------------------------------------------------------------------------------------------- |
| **Profile** | All the fields above — editable at any time |
| **Security** | Badge status, 2FA PIN, access schedule, access zones, authenticated-scanner-only toggle |
| **Badges** | Badge history — issue a new badge, view or revoke previous badges |
| **Health & Safety** | Emergency contact, allergies, medical conditions, disabilities, safety certifications, PPE requirements |
These tabs are covered in their own articles. For now, the defaults (Active status, no PIN, no schedule restrictions) are appropriate for most new employees.
***
## Approval Workflow
When the **employee approval workflow** is enabled on your tenant, newly added employees are placed in a **Pending** status instead of Active. They appear in the **Requires Approval** sub-tab of the Employees list. An Admin or Manager must review and approve them before their badge becomes active and scannable.
If you don't see a Requires Approval tab, the workflow is not enabled on your tenant.
***
## Keyboard Shortcuts
| Shortcut | Action |
| ------------ | -------------------------------------------------------------- |
| `Alt + N` | Open the Add Employee modal from the Employees list |
| `Alt + S` | Save the current employee record (inside the modal) |
| `Ctrl + 1–4` | Switch between Profile, Security, Badges, Health & Safety tabs |
| `Escape` | Close the modal (prompts if there are unsaved changes) |